This is Part Four of our remuddling updates. You can catch up on Part 1, Part 2 and Part 3 in previous posts.
Somewhere in mid-November, Tig got heat up and running. Before then, we were using electric heaters to warm up the uninsulated back room and kitchen addition. I liken that part of the Purple Palace to a gingerbread house. A bit over the top with wall treatments but completely lacking in the insulation and heating department. Our electric bills have reflected this minor problem.
After the freak snowstorm, Tig buckled down and disappeared into the basement for a couple of weeks to wrestle with the beast à la Ralphie’s father in A Christmas Story (minus the swearing). He pulled all the old ducting, moved the floor registers to the walls, re-routed the ducting, and put in a new thermostat.
There is no picture to show how wonderful it is to have furnace heat, especially in the main part of the house where the walls are insulated. We hope to have a wood stove someday, but for now, it’s amazing.
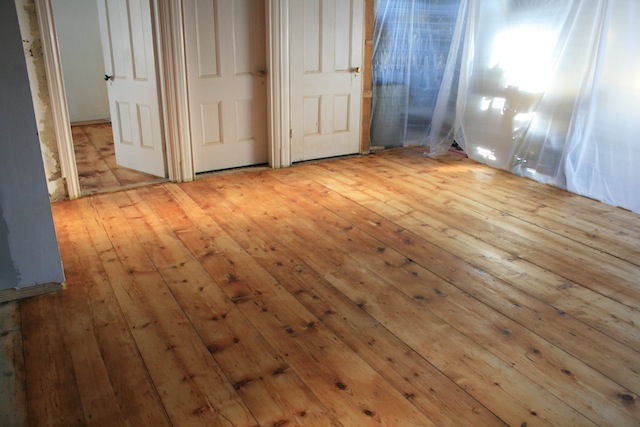
Instead, I’m posting pictures of our newly finished floors.
Future kitchen area.

First floor bedroom.
These two floor areas were under layers of carpet (and in some cases, linoleum) when we bought the house. Tig worked late into the night for several days, sanding the floors. He used both a square pad sander and an circular orbital sander–not a belt sander. For the finishing, I bought a hardwax oil called Rubio Monocoat (link here) after doing some research and reading this review. It was a one-coat product with no VOCs. Our house smelled like vegetable oil for a week.
I love the gentle matte finish. It complements our “reclaimed wood” look–check out those giant knots and burn-like marks in the bedroom, I’m fully embracing it. We expect these floors to be used hard. The best part about the hard wax oil is that when it starts to wear, we can patch parts of it at a time instead of re-sanding the whole floor.